26′ Gentlemen’s Racer “Biscayne Baby”
Bill Robbins
May 21, 2019
 Owners Story
Building My Dream Boat
During the time I was restoring Sparkle, a 22’ Chris-Craft Utility, the thought kept nagging me “boy, it would be so much easier to build a boat from scratch”. With that thought in mind in the fall of 2013 Gerry Davidson gave me a copy of plans for John Hacker’s Miss APBA, I was ready to go. At 26’ it was only four feet longer than my U22 so how hard could it be?
I soon found out there is a lot more to building from scratch but I was enjoying the process. The first step is to loft the plan on the wall in full size so I could make the frames. This required seven sheets of plywood painted white and several battens, nails and a chalk line. In today’s boatyards the lofting is done before lunch time on a computer and the output is a set of full size frame patterns. I was determined to do it the old fashion way and I am satisfied with the results. The attached pictures show just some of the steps taken to produce a 26’ Gentlemen’s Racer hull which will carry a 500 hp big block Chevy engine and run close to 60 mph.
Currently, I am putting the seal coat on the deck and topsides and will explain the non-conventional process I used.
 Frame is complete, two layer of 4 mm sapele plywood on bottom with final layer of 5/16” planking started.
 Bottom is planked and faired, Tom Drake is helping me apply one layer of 6 oz fiberglass cloth in 3 applications of West epoxy to saturate the weave. 2 or 3 coats of high build epoxy primer will be applied and faired then 3 coats of bottom paint.
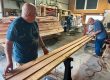
 King plank and covering boards are installed. Next the deck planks will be installed: 2” wide in individual planks with a 1/8” rabbet to form a seam to be filled afterwards.

Deck planks are being dry fitted between king plank and covering boards. Each plank was identified and installed in one continuous run from bow to stern wherever possible.

Planking is complete and all seams filled with thickened epoxy blackened with powdered graphite. The boat is outside because the next step is to sand the deck and seams with an 80 grit rotary sander which produces a cloud of black dust. The engine hatches have been sanded previously and re installed to help control the dust inside the boat.
 Tom Drake is applying the first of two epoxy seal coats on the freshly sanded deck and topsides. The technique is used in aircraft construction and model building: West 105 resin and special clear hardener 207 are thinned 20% with acetone and brushed lightly on the sapele. The brushing is followed closely with a squeegee which collects the excess liquid and moves it forward to uncoated surfaces. This is followed by a wiping with paper towels to further smooth out the surface and prevent drips, runs and puddles. The result is a smooth coating which seals the wood and brings out the grain nicely. As can be seen, there is no need for stain and the contrast between light and dark planks is reduced somewhat. This coat will be sanded with 150 grit the next day, wiped down and one more coat applied.

Complete hull after first coat of epoxy. The wood was sanded to 180 grit before

Forward bucket seats made from slats cut from plank material and epoxied together. Later they were faired and coated with epoxy and fiberglass cloth on the inside for added strength. They will be upholstered later.

The proud owner and the semi complete cockpit showing in the background.
Stay Tuned for an update on this beautiful project.
You can read more about our member Bill Robbins and his shop in the latest summer issue of Sheerline.